
Setting up an Ethernity CLOUD node
Nothing would work without them. They're the backbone of a decentralized network. They're the embodiment of the Ethernity CLOUD protocol. We're talking about nodes and how to set them up.

This article aims to give a high-level overview of the whole setup process. That means all further information will be found in the links provided. And if you stumble upon anything unheard of, the Discord community is a great, quick way to get answers:
Overview
There are two ways to get a node running:
Build your own node from scratch. You’ll find the documentation here.
Buy a preconfigured node from independent hardware affiliates.
Due to security reasons, if you buy a preconfigured one, you need to reset it, i.e. changing the password and the wallets. That being said, let's have a look at the steps you need to take to build your own node from scratch.
To get started, there are four necessary steps. And two more to keep the node running:
Check the hardware requirements.
Set up your System (BIOS, OS).
Create wallets for the node.
Install the node & get started.
------- Afterwards ------Configure the node (pricing & resources).
Maintain the node.
1. Hardware Requirements
Confidentiality starts here, within physical enclaves.
To set up an Ethernity CLOUD node, the primary requirement is a system with Intel SGX support. SGX, or Software Guard Extensions, is essential for the security and efficiency of the node. This is the Trusted Execution Environment (TEE), the physical enclave I’ve been writing about. Before purchasing new hardware, you should consult this list of compatible processors, and this list for motherboards, server devices, and notebooks.
2. System Setup
To make use of the SGX, enable virtual machines.
If you already own a device, you must enable Intel’s SGX and VT-x functions in the BIOS. It’s crucial for running secure virtual environments. Then you can install Linux (Ubuntu 18.04 LTS and 20.04 LTS x86_64). With that, you can also verify if your device supports SGX by running this prompt:
utils/linux/test-sgx The output should confirm SGX availability. You want to read this:
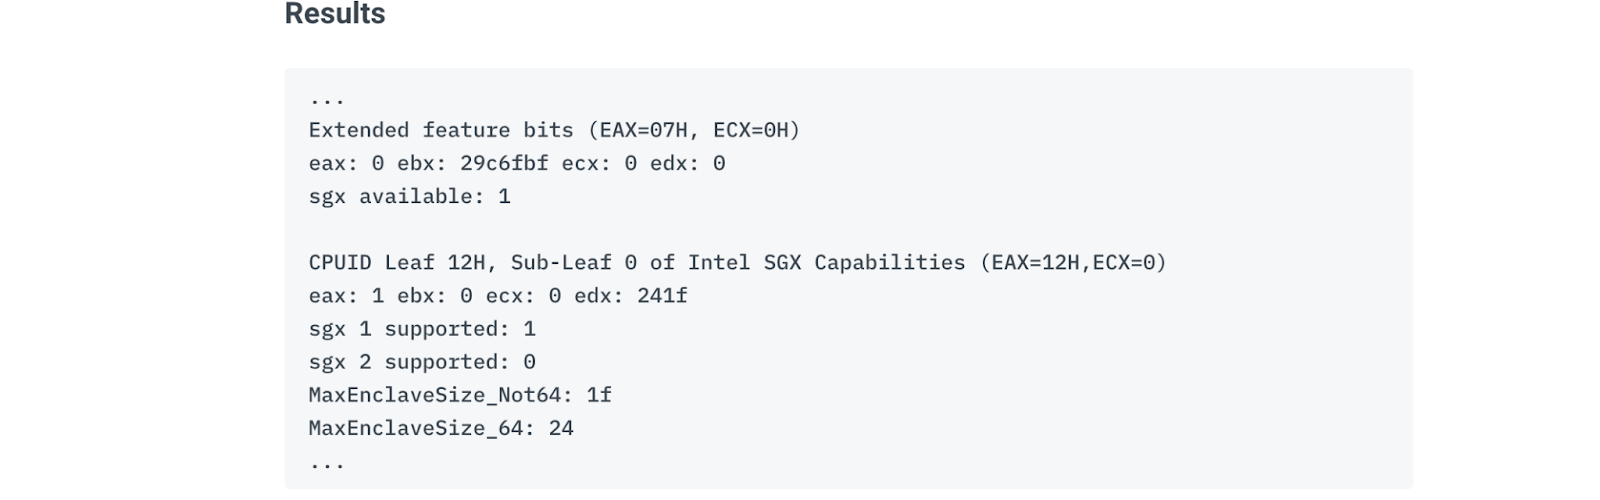
Linux is the required operating system for Ethernity nodes, offering benefits in ease of installation, configuration, and essential utilities like the just-mentioned SGX support checking. In the future, Ethernity CLOUD also plans to support macOS, Windows, and other platforms.
3. Wallet Creation & Network
Keep the separation consistent all the way to the wallets.
Operating an EC node requires two blockchain wallets:
One wallet is used by the data processor of the node for submitting transactions and operates outside the TEE enclave.
The other wallet is used by the result processor of the node inside the TEE enclave and submits transactions containing processing results.
These wallets can be created following the instructions in the Ethernity CLOUD documentation. The choice of network (Bloxberg or Polygon) for your wallets will determine the type of tokens needed to fund them. The funds are required to pay the gas fees for the transactions the node is doing for data and result submission.
As a node operator, you might want to choose the network based on potential demand. Bloxberg might be interesting for the scientific community. Polygon might be more of a mainstream approach for all kinds of computational use cases with more users.
4. Installation & Getting Started
After having compatible hardware, a set-up system with SGX and VT-x enabled, and having created two wallets, it’s time to install the node software. You can do that with the installation script:
$ cd mvp-pox-node && sudo ./etny-node-installer.shThe process is well-documented and straightforward. Detailed instructions can be found in the official installation guide and the Ethernity Node Quick Start. Following these guidelines will kickstart the operation of your node. You can follow the quick-start way and have all the settings on default, or you decide to configure your machine.
And that would be it… if you just want to try it out! I recommend checking the documentation if you are looking for a step-by-step guide. Finally, this article is meant to be a 5-minute overview.
5. Configuration & Pricing
There are two variables of configuration: Price and Resources.
With Price, I simply mean you decide how much a default task execution costs on your node. Keep in mind it costs a bit of electricity to run the node and you also need to pay the transaction costs, so you can’t offer it for free. At the same time, no one will use your node if you are too expensive. (This market is not established yet, but I’m extremely curious to see it evolving).
With Resources, I refer to the different parts of the node: RAM, CPU, and HDD/SDD. While general tasks can be handled with automatic settings for RAM, CPU, and storage, specific tasks may require customized configurations. For example, for data analysis, you need higher RAM, and a lot of storage but lower CPU capacities. For simulations based on the data analysis, you might need higher CPU power and less RAM. You choose how to customize your node and can always adapt to market needs. This flexibility allows for performance optimization and cost efficiency.
Follow these six steps, and you’re able to specifically define how much GB each part of the node can and should use.
6. Maintenance
Regular maintenance is crucial for the smooth operation of your node. This includes updating the node software, monitoring its performance, and addressing any issues that arise, for which a comprehensive troubleshooting guide is available. For all other questions, the community is very helpful in this regard:
Conclusion
Setting up and maintaining an Ethernity CLOUD node involves a combination of hardware compatibility, software installation, blockchain integration, and regular maintenance. By following the provided guidelines and resources, you can ensure that your node operates efficiently and contributes effectively to the Ethernity CLOUD network and its decentralization.
24.11.2023 Munich,
Marcel Ohrenschall